Introduction
Requirements
Before we dive in, I want to thank and congratulate you on purchasing one of my items. I truly appreciate your support and I'll do my best to provide you with an outstanding service.
Let's go over the minimum requirements that you will need in order to have a functional site using this plugin running in no time.
Plugin Files
After purchasing the plugin, download "All files & documentation" and your archive should have the following files contained within it.
- Available Files
- panorama360.zip
- —
- Documentation (folder with this help file)
- Licensing (folder)
Installation
Install via Dashboard
Once you have logged into your WordPress Dashboard, navigate to the Plugins page. Click on the Add New button and then from the available options select upload. Navigate to where your files are stored locally and select the panorama360.zip file, upload and activate the plugin.
Do not use the main ZIP file you downloaded (use panorama360.zip only), otherwise the whole process will fail.
Install via FTP
To install the plugin via FTP you will need to unzip the plugin archive (panorama360.zip) somewhere onto your machine. We will assume you have a working FTP program with login credentials as one is needed to install WordPress.
WordPress places it's plugins within the /wp-content/plugins/ folder. Navigate to this folder within your install and then place the panorama360 folder within it.
Once the folder has been uploaded, in your WordPress Dashboard navigate to Plugins and activate the plugin.
Plugin Settings
The plugin is based on a single [panorama360] shortcode that outputs the style and functionality it needs to work properly. You can either add the shortcode manually or use the TinyMCE button provided by the plugin (when using the Classic Editor).
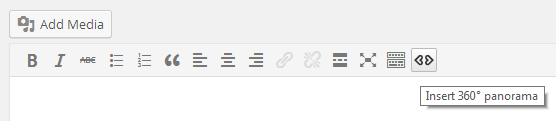
Shortcode Generator
The TinyMCE Visual Editor toolbar contains a special button added by the plugin. Use it to generate your shortcode attributes more easily. I recommand you upload the image locally (instead of using a remote path) because it's processed faster and does not require you to know it's width and height values.

Shortcode Attributes
If you know your way around shortcodes then use the [panorama360] keyword and the following attributes.
- type: source image type: flat or equirectangular (default: flat)
- src: source image path (mandatory and used only for a flat panorama)
- src_width: source image width in pixels (mandatory and used only for a flat panorama)
- src_height: source image width in pixels. (mandatory for flat panoramas)
- style: add additional style to the panorama DOM element - it will be attached inline so use only element based inline CSS styling
- title: caption title used to quickly identify the panorama image (optional)
- title_link: link for the caption title (optional)
- title_link_target: Determines the target for the title link (optional): can be empty to open the link in same window or _blank to open the link in a new tab
- is360: determines the viewer type of rotation: 180 degree or 360 degree (default: true, used only for a flat panorama)
- mousewheel: determines if the viewer can be controlled using the mouse wheel false - disabled, true - enabled (default: false)
- mousewheel_multiplier: determines the factor that will influence scrolling using the mousewheel (default: 10)
- start_position: Set initial horizontal start position for the viewer (default: 0, in pixels for a flat panorama, in degrees for a equirectangular panorama)
- start_position_centered: Determine if the start position should be centered in the viewport (default: false, available for a flat panorama)
- sliding_controls: Determine if UI controls for sliding the viewer are created: false - don't create them, true - create them (default: true)
- sliding_direction: Determine the automatic sliding direction: 0 - no automatic slide effect, 1 - right side effect, -1 - left side effect (default: 0)
sliding_interval: determines the interval of the sliding timer (in miliseconds) (default: 10); deprecated, will not be used any more in favor of a better solution- sliding_factor: Determines the automatic sliding movement factor (between 0.1 and 2, default: 0.8 for a flat panorama image; between 1 and 50, default: 8 for a equirectangular panorama image)
- sliding_drag_stop: Determine if automatic sliding effect is stopped on mouse/touch dragging events (default: true)
- block_contextmenu: Determines if the context menu is blocked (right click is prevented): false - allow right click, true - disable right click (default: false)
- bind_resize: determines if window resize affects the panorama viewport: false - disable window resize, true - enable responsive behavior (default: true)
- map: determines the ID of the map with hotspots that will be used by the viewer - the plugin uses the standard map tag with support only for rect area shapes. Attribute available only for a flat panorama.
Note: The plugin manipulates existent flat 180/360 or equirectangular panoramic images and doesn't glue/stitch multiples slides into a big image (please see some examples here).
Performance: The speed and rendering performance depends on your browser, CPU, graphics card, etc. If you notice the scrolling has lags try to reduce the image size (in width and height) or sliding factor.
Shortcode Examples
-
Flat panorama images
[panorama360 src="pano1.jpg"][/panorama360]
[panorama360 src="http://otherdomain.com/pano2.jpg" src_width="1200" src_height="600"][/panorama360]
[panorama360 src="pano3.jpg" is360="false"][/panorama360]
[panorama360 src="pano4.jpg" style="position: absolute; top: 0; left: 0; width: 100%; height: 100%; z-index: 0;" mousewheel="true"][/panorama360]
[panorama360 src="pano5.jpg" map="pano5-map"]
 <map id="pano5-map" name="pano5-map">
  <area class="round" shape="rect" coords="90,190,180,230" href="hotspot.jpg" target="_blank" alt="A hotspot" />
 </map>
[/panorama360]
-
Equirectangular panorama images
[panorama360 type="equirectangular" src="pano1.jpg"][/panorama360]
[panorama360 type="equirectangular" src="http://otherdomain.com/pano2.jpg"][/panorama360]
[panorama360 type="equirectangular" src="pano4.jpg" style="position: absolute; top: 0; left: 0; width: 100%; height: 100%; z-index: 0;" mousewheel="true"][/panorama360]
Gutenberg Block
The plugin is compatible with the new WordPress editor: Gutenberg. It has special blocks, which may be easier to use then the shortcode version.
When editing a page with the new editor, add the Flat Panorama block or the Equirectangular Panorama block located in the Media Blocks category. You'll be able to paste a link, upload or select the panorama image from the local Media Library.

All the panorama options are located in the Sidebar > the Block tab. These are exactly the same as the shortcode attributes.

You can also convert your existent panorama shortcodes to blocks using the Convert to Blocks option in the "Classic" block menu.

Also, you can transform an existent panorama block from one type to another using the Transform to option in the block menu.

Further Info
Video Guides
Further Support
If you have any questions that are beyond the scope of this help file, please feel free to email via my user page contact form (right sidebar, at the bottom). Don't forget to help me out by rating and leaving your feedback for the plugin at: codecanyon.net/downloads. Thank you and good luck with your work!