Introduction
Requirements
Before we dive in, I want to thank and congratulate you on purchasing one of my items. I truly appreciate your support and I'll do my best to provide you with an outstanding service.
Let's go over the minimum requirements that you will need in order to have a fully functional site using this theme running in no time.
WordPress Install
WordPress provides a fully comprehensive and in depth guide to installation on their codex site.
So instead of going over what's already been outlined there, I will simply point you in the direction of the Famous 5 Minute Install.
If you have little or no knowledge of how WordPress works please take some time to familiarize yourself with the framework.
Theme Files
After purchasing the theme, if you chose to download "All files & documentation" your theme folder should have the following files contained within it.
- Available Files
- castpod.zip
- castpod-child.zip
- —
- Documentation (folder with this help file)
- Licensing (folder)
- Samples (folder)
If you chose to download "Installable WordPress file only" you should have the castpod.zip archive by itself, which is ready to be installed via the dashboard.
Making Custom Changes
The main package comes with a child theme (castpod-child.zip) that inherits the look and functionality of the main theme. A child theme is the safest and easiest way to modify an existing theme, whether you want to make a few tiny changes or extensive changes. Instead of modifying the theme files directly, you should use a child theme.
If updates will be available (which might be important for security or functionality) and you decide to update the theme you should know your file changes are safe in the child theme. Speed up development time and be smart about it from the beginning.
The child theme must be installed after the main theme installation.
Installation
Install via Dashboard
Once you have logged into your WordPress Dashboard, navigate to Appearance > Themes. Click on the Add New button and then from the available options select upload. Navigate to where your files are stored locally and select the castpod.zip file then Install Theme.
If the theme was installed successfully you should be met with notifications regarding installing plugins and activating the theme.
Do not use the main ZIP file (which contains Documentation and Samples) - use the installable castpod.zip only, otherwise the whole process will fail with a message: "Broken theme and/or stylesheet is missing".
Install via FTP
To install the theme via FTP you will need to unzip the theme archive (castpod.zip) somewhere onto your machine. We will assume you have a working FTP program with login credentials as one is needed to install WordPress.
WordPress places it's themes within the /wp-content/themes/ folder. Navigate to this folder within your install and then place the castpod folder within it. You will know this is the correct folder as the default WordPress themes (Twenty Sixteen, Twenty Fifteen) will be here as well.
Once the folder has been uploaded, in your WordPress Dashboard navigate to Appearance > Themes and activate the theme.
Install Plugins
Once the theme has been installed successfully you will be prompted to install the plugins available with the theme and some that are recommended. Click on "Install Plugins" to get started.
Castpod Helper is the required plugin that MUST be installed. While the remainder of the plugins are not required, I recommend you install them as well.
- Contact Form 7 — manage multiple AJAX based contact forms
- Responsive Lightbox — gives the ability to view larger versions of images and galleries in a lightbox (overlay) effect optimized for mobile devices
- Simple Page Sidebars — gives the ability to assign custom sidebars to individual pages
Theme support cannot be offered for external plugins (even if they are recommended). If you notice any compatibility issue please let me know — I'll investigate it and do my best to offer suggestions.
Site Setup
Demo Content (Optional)
If this is your first time using WordPress I strongly recommend you import the demo content. Importing the demo content will bring in all the posts, pages, menus, widgets and theme options from the demo, into your site.
To import the demo content navigate to Appearance > Import Demo Data within your dashboard and follow the instructions.

Note: The import process requires the Castpod Helper plugin (bundled), so make sure you install and activate it first thing.
Note: If you have problems with this process please try the default WordPress import — visit the Tools > Import section and upload the content.xml WordPress file available in the Samples folder.
Page Setup
If you've installed the demo content move on to Permalinks section, otherwise let's start at Step 1.
Step 1 - Page Creation
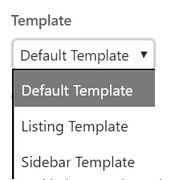
To create a page navigate to Pages within your dashboard and click Add New. Give your page a title and then set the page template (if other then the default regular template). The following pages require special templates to be set.
- Listing - Listing Template (displays the latest posts from a category, may include episodes as well)
- Sidebar - Page Sidebar Template (displays a sidebar where you can add custom widgets)
Step 2 - Reading
We now need to change the homepage of the site to whatever page you like. Navigate to Settings > Reading in your dashboard.

Change the Front Page Displays setting to A static page and set your desired Front page.
Menu Setup
To setup your menu navigate to Appearance > Menus. If you've installed the demo content, a menu should be available to select from. If not, create a new menu.

Add the pages that we created previously into the menu (rearrange if needed) and then under the Menu Settings tick Primary Menu location.

Once that's done hit Save Menu
Permalinks
If you want to change the way your pages and posts are visible in the URL address bar you will need to change your permalinks.
Navigate to Settings > Permalinks and select your "Common Settings" option. Typically the most common selection is "Post Name", but feel free to select any of the options available. Click Save Changes and test that your site is still up and running.

If you experience 404 errors at any time while using your site, you should come back here and re-save your permalinks.
After your settings have been updated your page and post URLs should reflect the changes made.
Post/Page Settings
Post/Page Settings
When editing any post you'll notice some additional properties under the content editor. The section is called Additional Theme Fields and may have different options depending on the post type or page template. Take some time and familiarize yourself with this section and read each field description using the Help tab in the upper right corner of your admin screen. These options may override the default Customizer options.

Listing Settings
Setting up a blog or listing episodes is as simple as creating a new page, selecting a Listing Template and adding new posts/episodes to your site.
You also have the option to filter the posts by a specific category (useful if you like to create different unique blog or episodes pages) and set the layout style.

Episodes Settings
Episodes are custom post types, similar to posts. They have additional settings specific to a podcast context and available in the Additional Theme Fields section.

Take some time and familiarize yourself with this section and read each field description using the Help tab in the upper right corner of your admin screen.
If you want to display the latest episode in a specific context (like the homepage header area), you can use a simple shortcode in any content area or widget. Here is a shortcode example and its supported parameter attributes.
[podcast_episode id="latest" title="true"]
- id — id of the episode post or 'latest' (default: latest);
- title — determine if the title of the episode is posted above the audio player (default: false);
- title_tag — tag in which the title is wraped (default: h2);
- title_link — determine if the title links to the actual episode post (default: true);
- title_class — add an additinal class to the title element.
Theme Options
Customizer Options
When using the theme, you may have noticed a section within the dashboard called "Customize". This section contains all the main options which customize the look and feel of the theme. Lets navigate to this page and have a look at the available options.

Site Identity — set the Logo for the web site that will replace the Site Title and Tagline text information (suggested image dimensions 150 × 40, but will adapt nicely to your needs). This section also gives you the option to set a Site Icon that will be used as a browser and app icon.
Colors — set some basic options regarding site colors. The Background Color is referring to the main content area background color and the Featured Area Background Color/Invert Featured Area Text Color controls the default colors for the hero area background and foreground colors (you can override these settings in each page/post). The Link Color controls the color of each anchor in the main content area (for those of them it can applied to). Also, you have options to change the Footer Background and Invert Footer Text Color.
Header Image — set the default image settings of the featured area (header) area for all the pages of the site (you can override these settings in each page).
Background Image — set the default image of the main content area (can be used as a tile instead of the Background Color option).
Menus — manage standard menu options.
Widgets — manage widgets placed into the sidebar or footer area provided by the theme.
Homepage Settings — manage page that will be displayed as front page (I suggest using a static page as Homepage and leave the Posts page empty).
Additional Options — set additional options for the site.
Additional CSS — add extra CSS to your site for advanced users (and avoid modifying the core style.css file directly).
Podcast Options
The theme offers the ability to build a proper feed for your podcast, which you can share and publish on any podcasting service (including iTunes). You can access it via Episodes > Podcast Settings. Please go over all the options so your listeners will know more about your podcast before they subscribe.

If you experience 404 errors for the feed page, you should visit the permalinks settings page and re-save your permalinks.
Import Podcast
The theme offers the ability to import podcast episodes and settings from an external RSS feed (via Tools > Import > Podcast RSS Feed). This allows you to transfer information from one site to another or from any podcasting service to your personal site.

The import process obtains only the information and the items from the feed (title, description, audio link, etc. including the images), but doesn't handle the actual transfer of audio files (which in almost all cases will cause errors due to hosting provider limitations). I strongly recommend using a storage plugin that serves your media files from an external provider, avoiding any bandwidth or any other kind of technical limitation (WP-Stateless, WP Offload S3, Google Cloud Storage).
There is the ability of running the import process from time to time, making it easier for you to automate your posting process. You'll need to install and activate the WP Crontrol plugin and add a recurring PHP Cron Event with the following code (changing the feed URL and category ID/slug, of course):
// Set up the environment
if ( ! defined('ABSPATH') ) {
	require_once( dirname( dirname( dirname( dirname( __FILE__ ) ) ) ) . '/wp-load.php' );
}
require_once( ABSPATH . 'wp-admin/includes/admin.php' );
define( 'WP_LOAD_IMPORTERS', true );
require_once( WP_PLUGIN_DIR . '/castpod-helper/includes/rss-importer/class-podcast-rss-import.php' );

// Run manual import process, replace the URL of the feed
Podcast_RSS_Import::run_import( 'http://site.url/feed/podcast', $import_category = get_option( 'default_category' ), $import_attachments = true, $import_settings = true, $cron_job = true );
Further Info
Video Guides

FAQ
-
Missing style sheet error when installing the theme?
A common issue that can occur with users new to installing WordPress themes is a "Broken theme and/or stylesheets missing" error message being displayed when trying to upload or activate the theme. This error message does not mean that the theme you have purchased is broken, it simply means it has been uploaded incorrectly. Luckily, there is a very easy fix.
-
Is the theme SEO friendly and where can I access such settings?
The theme is built to be SEO friendly, by emphasizing titles with heading tags, having the content before anything else, stripping out useless content, fast loading, setting titles in the header for better crawling and so on. All these help, but you have to remember that "Content is King"! You should not blame the theme if your website doesn't appear in top search engine results, but instead focus on providing good content and in this way, your website will definitely look great in search engines. I suggest you install a SEO plugin which offers great additional options and control over titles, keywords or description, just to mention a few. I recommend using Yoast for SEO.
-
How can I translate the theme in my own language or use multiple ones based on user preference?
This theme is localized, which means it can easily be translated in your own language. There are various methods to do a simple translate or create a website in multiple languages, so just use the one which works best for you. If you're not familiar with translating themes manually (using .pot file), I suggest you install the Codestyling Localization plugin. This way you'll be able to edit the language strings directly from the WordPress dashboard. You may also need to use the WordPress Language plugin to enable a certain language for your theme. If you want your website to be available in two or more languages, you might find the WPML premium plugin useful.
-
How can I workaround the NGINX rules for the media files of the player and avoid a media not found error or inability to use the player?
If your hosting provider is based on NGINX then you need to add some specific bypass rules for the media rewrites:
- for WP Engine sites you need to log a support ticket asking them to add the NGINX bypass rules for download-episode and episode-player URLs of your site's configuration file (Before Rule):
rewrite download-episode/([^/]+)/([^/]*)/? /index.php?podcast_episode=$1&podcast_slug=$2 break; rewrite episode-player/([^/]+)/([^/]*)/? /index.php?podcast_episode=$1&podcast_slug=$2&podcast_ref=player break; - for other NGINX based hosts you will need to add two new rules to your nginx config in the server directive, in order to handle the download-episode and episode-player URLs as a .php file (even though the URL states that it is a media file) and bypasses it through to PHP-FPM:
location ~* ^/download-episode/ {
    try_files $uri $uri/
    fastcgi_index /index.php;
    include fastcgi_params;
    fastcgi_pass 127.0.0.1:9000;
}

location ~* ^/episode-player/ {
    try_files $uri $uri/
    fastcgi_index /index.php;
    include fastcgi_params;
    fastcgi_pass 127.0.0.1:9000;
}
You may need to change fastcgi_pass 127.0.0.1:9000; to match that of your PHP-FPM configuration.
- for WP Engine sites you need to log a support ticket asking them to add the NGINX bypass rules for download-episode and episode-player URLs of your site's configuration file (Before Rule):
Further Support
If you have any questions that are beyond the scope of this help file, please feel free to email via the Support tab of the item or via my user page contact form (right sidebar, at the bottom). I'd appreciate if you can help me out by rating and leaving your feedback for the theme via themeforest.net/downloads. Thank you and good luck with your work!
